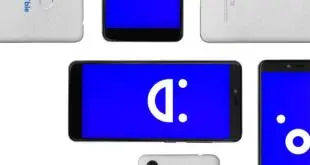
Obtenga una vista previa rápida de su juego en un dispositivo Android | Tutorial de Drive


🎁 Apóyame y DESCARGUE el proyecto Unity: ¡este tutorial / guía le mostrará cómo probar y obtener una vista previa de su juego en un dispositivo Android real en muy poco tiempo! Esto puede ser útil si su juego depende de algunos sensores (como GPS, giroscopio, etc.) y la entrada del buscador como se muestra en este video. ¡Aprenderá a usar Unity Remote y la fantástica función de Unity llamada “Build and run” que le permite probar su juego en el dispositivo conectado en segundos! 💜 Únase a nuestro Discord: 🔵 Sígueme en Twitter: aprenderá: – Cómo usar el control remoto de Unity – Cómo probar rápidamente su juego en un dispositivo móvil – Cómo ingresar al modo de desarrollador de Android – Qué es “Construir y ejecutar” en Unity – Cómo habilitar Build and Run en Unity Timestamps: 0:00 – Intro 0:32 – Set Unity 1:18 – Prepare su teléfono 3:04 – Habilite el modo de desarrollador 3:44 – Mirror Screen 4:21 – Build and Run .

Compruebe también

Transfiere datos de Android a iPhone con Switch to iOS #shorts

Más consejos sobre cómo transferir datos de Android a iPhone: Antes de comenzar: 1. Instale …

28 comentarios

  1. Hi, Does Unity Remote works with ARCore?

  2. Hello Sir! Is there any way we can test our unity games without connecting by USB with wifi?

  3. I love you <3 Very thank a thousand of times!

  4. I really like your tutorials, thanks for your work ! Best

  5. Good job bro it realy helped me

  6. Man you are a lifesaver!!!

  7. First person view Script

    using UnityEngine; using System.Collections; using System.Collections.Generic;   [AddComponentMenu("Camera-Control/Smooth Mouse Look")] public class SmoothMouseLook : MonoBehaviour {   public enum RotationAxes { MouseXAndY = 0, MouseX = 1, MouseY = 2 } public RotationAxes axes = RotationAxes.MouseXAndY; public float sensitivityX = 15F; public float sensitivityY = 15F;   public float minimumX = -360F; public float maximumX = 360F;   public float minimumY = -60F; public float maximumY = 60F;   float rotationX = 0F; float rotationY = 0F;   private List<float> rotArrayX = new List<float>(); float rotAverageX = 0F;   private List<float> rotArrayY = new List<float>(); float rotAverageY = 0F;   public float frameCounter = 20;   Quaternion originalRotation;   void Update () { if (axes == RotationAxes.MouseXAndY) { rotAverageY = 0f; rotAverageX = 0f;   rotationY += Input.GetAxis("Mouse Y") * sensitivityY; rotationX += Input.GetAxis("Mouse X") * sensitivityX;   rotArrayY.Add(rotationY); rotArrayX.Add(rotationX);   if (rotArrayY.Count >= frameCounter) { rotArrayY.RemoveAt(0); } if (rotArrayX.Count >= frameCounter) { rotArrayX.RemoveAt(0); }   for(int j = 0; j < rotArrayY.Count; j++) { rotAverageY += rotArrayY[j]; } for(int i = 0; i < rotArrayX.Count; i++) { rotAverageX += rotArrayX[i]; }   rotAverageY /= rotArrayY.Count; rotAverageX /= rotArrayX.Count;   rotAverageY = ClampAngle (rotAverageY, minimumY, maximumY); rotAverageX = ClampAngle (rotAverageX, minimumX, maximumX);   Quaternion yQuaternion = Quaternion.AngleAxis (rotAverageY, Vector3.left); Quaternion xQuaternion = Quaternion.AngleAxis (rotAverageX, Vector3.up);   transform.localRotation = originalRotation * xQuaternion * yQuaternion; } else if (axes == RotationAxes.MouseX) { rotAverageX = 0f;   rotationX += Input.GetAxis("Mouse X") * sensitivityX;   rotArrayX.Add(rotationX);   if (rotArrayX.Count >= frameCounter) { rotArrayX.RemoveAt(0); } for(int i = 0; i < rotArrayX.Count; i++) { rotAverageX += rotArrayX[i]; } rotAverageX /= rotArrayX.Count;   rotAverageX = ClampAngle (rotAverageX, minimumX, maximumX);   Quaternion xQuaternion = Quaternion.AngleAxis (rotAverageX, Vector3.up); transform.localRotation = originalRotation * xQuaternion; } else { rotAverageY = 0f;   rotationY += Input.GetAxis("Mouse Y") * sensitivityY;   rotArrayY.Add(rotationY);   if (rotArrayY.Count >= frameCounter) { rotArrayY.RemoveAt(0); } for(int j = 0; j < rotArrayY.Count; j++) { rotAverageY += rotArrayY[j]; } rotAverageY /= rotArrayY.Count;   rotAverageY = ClampAngle (rotAverageY, minimumY, maximumY);   Quaternion yQuaternion = Quaternion.AngleAxis (rotAverageY, Vector3.left); transform.localRotation = originalRotation * yQuaternion; } }   void Start () { Rigidbody rb = GetComponent<Rigidbody>(); if (rb) rb.freezeRotation = true; originalRotation = transform.localRotation; }   public static float ClampAngle (float angle, float min, float max) { angle = angle % 360; if ((angle >= -360F) && (angle <= 360F)) { if (angle < -360F) { angle += 360F; } if (angle > 360F) { angle -= 360F; } } return Mathf.Clamp (angle, min, max); } }

  8. omg men your video helped me a lot! Thanks and keep up the good work!

  9. OMG Thank you very much!!

  10. Keep going you will help millions

  11. Thank you so much. The part about developer mode was giving me a headache

  12. thank you so so much, you are a life saver

  13. Thanks a lot! This was a great and very useful video!

  14. hi, does it support new input system?

  15. Your resolution worked for me, 1080 x 2400 and I figured out I have a poco phone, great vid!

  16. You deserve so much more attention given how much effort is put into these videos and their educational value. Keep up the good work!

  17. Great video, edit etc all perfect. Thank you.

  18. muy informativo y al grano, gracias

  19. nie no jednak nie wiem jak zdobyc playfab id innego gracza n.n

  20. Please make a video on how to fire a gun with UI Button in unity
    Please

  21. Keep up the good work Mr. Coco!

  22. OG channel will rise soon (Millions Subs or even more!!).

  23. If i know something about unity ui that because of this channel……❤

  24. Woow…it was always there but i did nit think of that way ….damn i wasted so many hours installin apk and testing it manually…thank youuuuuu.

  25. O'Brother
    I have a problem with the program, every build build says Gradle build has failed, knowing that Gradle is one of the program's build files like SDK and jdk, but I installed a good version and it does not have any problems, mm

  26. the coconut is highlight :))

Deja una respuesta

Tu dirección de correo electrónico no será publicada. Los campos obligatorios están marcados con *